Disaster Management · TEE · mocks
TEE mock A
TEE practice
New 100-mark practice papers using the observed recent choice pattern
100 marks · 3 hours. Q1(a–d) compulsory; attempt any four complete questions from Q2–Q7. Each complete question carries 20 marks. This is a newly written practice paper, not a PYQ. All answers are shown below their questions.
Q1(a). Define hazard, exposure, vulnerability, capacity and disaster risk. [5 practice marks]
Answer
Definition. A hazard is a potentially harmful process, phenomenon or human activity. A disaster is a serious disruption of a community caused when hazardous events interact with exposure, vulnerability and limited capacity.
One example, from cause to consequence
Heavy rain is a hazard. People living beside an overflowing drain are exposed. Weak houses and blocked drainage increase vulnerability. Rescue boats, warnings and safe shelters increase capacity. If flooding seriously disrupts lives, services and livelihoods, the event becomes a disaster.
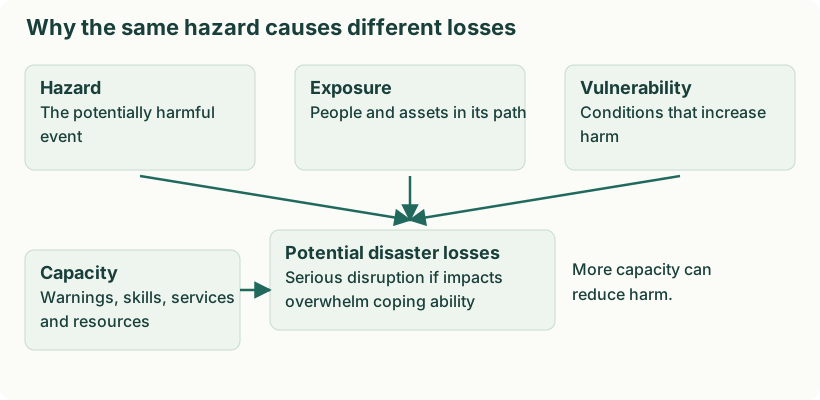
| Term | Meaning | Flood example |
|---|---|---|
| Hazard | What can cause harm? | Heavy rainfall / high river flow |
| Exposure | Who or what is in the affected place? | Homes beside the river |
| Vulnerability | Why can those exposed suffer damage? | Weak houses; limited mobility; poor drainage |
| Capacity | What strengths help manage the threat? | Warnings, shelters, trained rescue teams |
| Disaster risk | Potential losses before the event occurs | Possible deaths, damage and disruption |
| Disaster | Serious disruption when the event occurs | Homes inundated and essential services overwhelmed |
Q1(b). Explain why training and drills are needed. [5 practice marks]
Answer
Need
- Convert knowledge into action. People may know an alarm exists but still not know which exit or assembly point to use. Training explains the procedure; a drill rehearses it.
- Reduce confusion. Assigned roles and rehearsed communication reduce duplicated work and missed responsibilities.
- Identify weaknesses. A drill can reveal blocked exits, inaudible alarms, inaccessible routes and inaccurate contact lists.
- Include all occupants. Visitors and people needing assistance must be included in plans rather than assumed to evacuate independently.
Objectives
- Practise safe behaviour. Participants recognise the warning and follow the correct protective procedure.
- Test coordination and accountability. Wardens, emergency services and occupants communicate and account for people at the assembly point.
- Improve the plan. Observers record delays and gaps; organisers assign corrections and repeat the exercise to verify improvement.
Q1(c). Give five points about the Bhopal gas tragedy. [5 practice marks]
Answer
- Event and setting: A major toxic gas release occurred at the Union Carbide pesticide plant in Bhopal during the night of 2–3 December 1984.
- Causes and vulnerability: Release of methyl isocyanate and failures of industrial safety and preparedness exposed nearby communities.
- Impacts: Severe acute harm, long-term health and social consequences, and difficult compensation and environmental questions.
- Response and recovery: Emergency medical response and long-term care and relief; the event exposed weaknesses in chemical risk communication and regulation.
- Lessons: Maintain safety systems; assess off-site risk; coordinate industry, hospitals and authorities; disclose hazard information; practise response; provide accountable long-term recovery.
Q1(d). Explain two ways to communicate a cyclone warning. [5 practice marks]
Answer
For cyclone risk, communication must connect the warning to a protective action. Use several channels, accessible languages and backup power, and assign responsibility for updates.
- Official mobile alerts. Send location-specific SMS/cell-broadcast or official app alerts with the hazard, time, expected impact and action. They are fast and can be updated, but cannot be the only method because phones, power or networks can fail.
- Local public-address and community networks. Use sirens with a taught meaning, announcements, police, local volunteers and door-to-door assistance where safe. These methods reach people who cannot read a text alert or need physical evacuation support.
Message structure: authority and issue time → affected place → hazard and expected impact → protective action and safe destination → next update/contact. Confirm that high-risk groups received and understood the message; broadcasting alone does not prove successful evacuation.
Q2(a). Explain earthquake causes and three types of seismic waves with sketches. [10 practice marks]
Answer
Definition. An earthquake is ground shaking caused by a sudden release of stored energy in the Earth. Most destructive earthquakes result from sudden slip on a fault, sending out seismic waves.
Build the idea one step at a time
- The outer rigid Earth is divided into tectonic plates. Their slow relative movement loads rocks with stress.
- A fault is a fracture or zone of fractures along which rock blocks can move. Friction can temporarily lock the blocks.
- The rocks deform and store elastic energy. When stress exceeds the resistance to slip, the fault moves suddenly. This is the elastic-rebound explanation.
- Energy travels outward as seismic waves. These cause shaking at the surface. The waves carry the released energy; they are not the original tectonic cause.
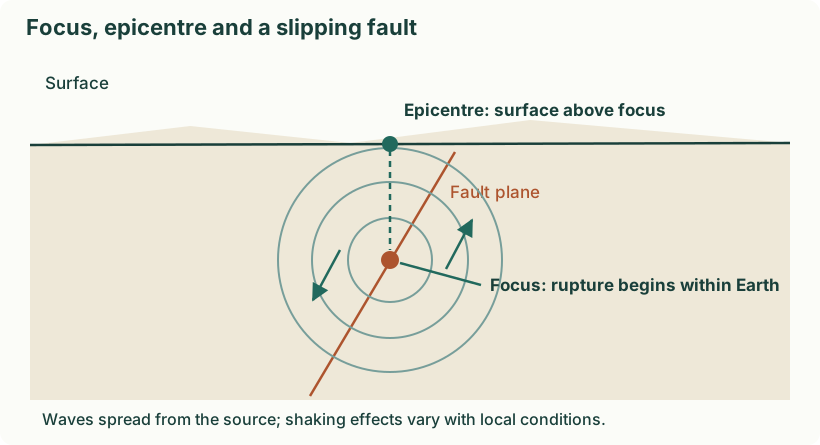
| Word | Meaning |
|---|---|
| Focus / hypocentre | The point inside the Earth where rupture begins. |
| Epicentre | The point on the surface vertically above the focus. |
| Focal depth | Vertical distance from the surface to the focus. |
| Foreshock / mainshock / aftershock | Smaller preceding event, largest event in a sequence, and subsequent events; “foreshock” is usually identified retrospectively. |
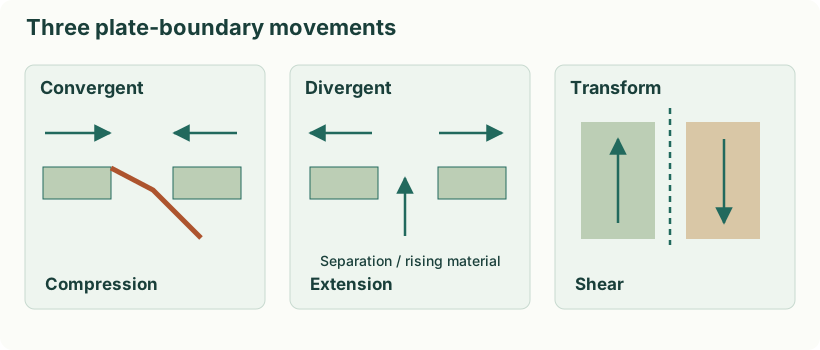
Most earthquakes result from sudden fault slip releasing stored strain. Volcanic processes, collapse and certain human activities can also generate earthquakes; seismic waves are the released energy travelling outward, not the underlying tectonic cause.
Three plate movements that build stress
- Convergence. Plates move together, causing compression, subduction or collision. Locked faults can release stored energy suddenly.
- Divergence. Plates separate and the crust extends. Faulting associated with extension can generate earthquakes.
- Transform motion. Plates slide past one another. Friction can lock parts of a fault until stress overcomes resistance and slip occurs.
Definition. Seismic waves are disturbances carrying earthquake energy. Body waves travel through the Earth; surface waves propagate along its surface.
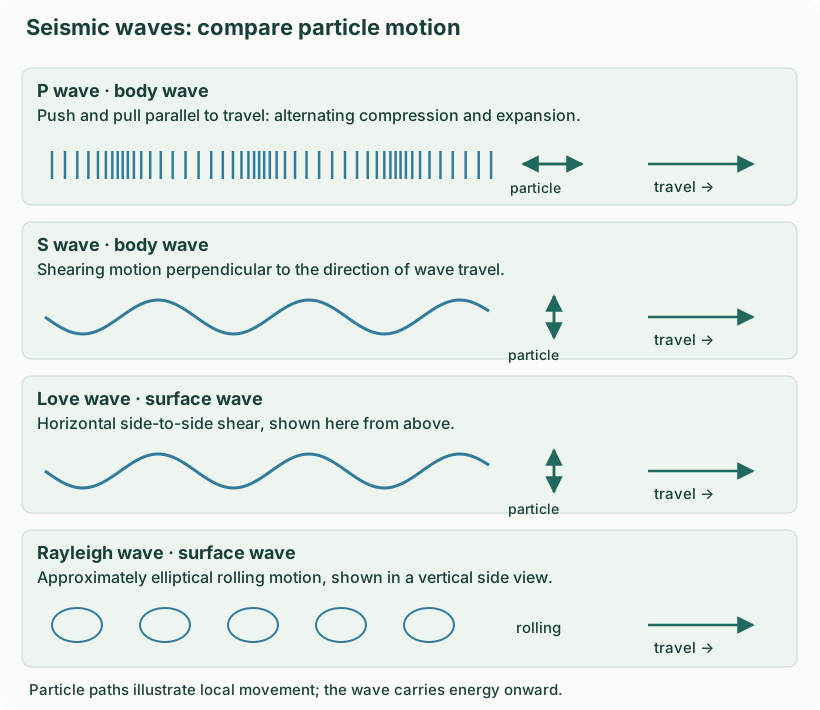
| Wave | Particle movement | Travel / key point |
|---|---|---|
| P: primary | Compression and expansion parallel to travel direction. | Fastest body wave; travels through solids and fluids. |
| S: secondary | Shearing perpendicular to travel direction. | Slower than P; cannot propagate through liquids as shear waves. |
| Love | Horizontal side-to-side surface motion. | Surface wave; produces strong lateral shaking. |
| Rayleigh | Rolling, approximately elliptical motion in a vertical plane. | Surface wave with vertical and horizontal ground movement. |
“Direction of travel” means where wave energy moves. “Particle movement” means how a small part of the ground moves locally. A particle need not travel all the way from the fault to your city. Do not list Love waves as body waves.
How shaking is recorded
A seismometer senses ground movement. A seismograph is the sensing-and-recording system; a seismogram is its record. A classical instrument uses inertia: the supporting ground moves relative to a suspended mass. Modern electronic instruments record a time series. Sensor, recorder and timing reference are the three basic components.
Why P–S arrival separation is useful
P waves arrive first because they travel faster. The P–S time gap generally increases with source distance. Records from several stations constrain earthquake location. One station alone does not uniquely locate an epicentre; real location calculations use travel-time models.
Q2(b). Explain five measures for river-flood risk reduction. [10 practice marks]
Answer
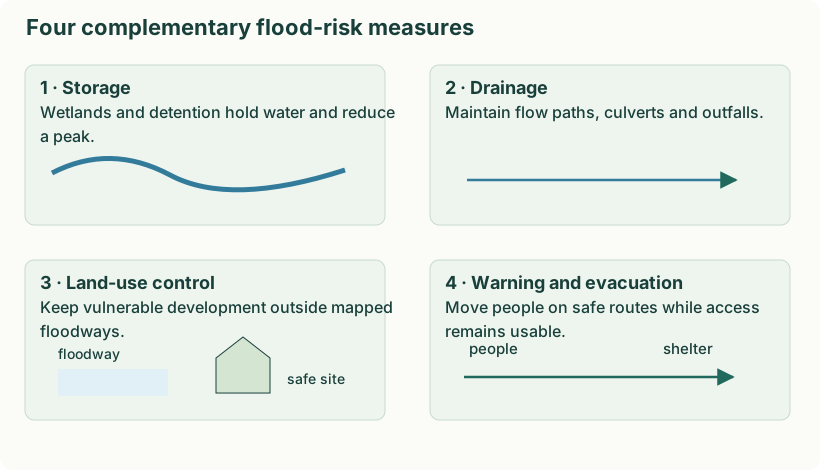
- Maintain the catchment and natural storage. Protect wetlands and floodplains and restore suitable vegetation. These measures slow runoff and store part of the floodwater, although they cannot eliminate extreme floods.
- Manage channels and drainage. Remove blockages and maintain bridges, culverts and drains. Engineering surveys should guide selective desilting; indiscriminate excavation can damage banks and ecosystems.
- Use storage and coordinated reservoir operation. Detention basins and reservoirs can hold water and release it more slowly. Forecasts, operating rules and downstream warnings are essential because storage and outlet capacity are finite.
- Apply floodplain zoning and resilient construction. Keep new critical facilities outside high-risk zones. Where occupation is permitted, use suitable raised floors, protected utilities and evacuation access to reduce losses.
- Combine protection with warning and preparedness. Appropriately designed embankments or levees protect selected areas, but can overtop or fail. Maintain them, issue actionable forecasts, mark escape routes and provide safe shelters for the remaining risk.
Q3(a). Explain the disaster management cycle with a drought example. [10 practice marks]
Answer
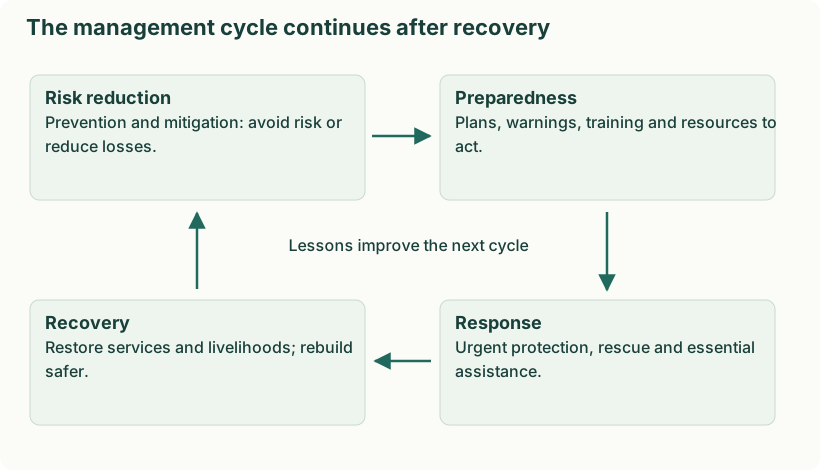
- Prevention and mitigation. Reduce avoidable vulnerability through watershed conservation, suitable cropping, efficient water use and sustainable groundwater management. These do not prevent every rainfall deficit.
- Preparedness. Monitor rainfall, storage and crop stress; plan water priorities, advisories, supply contingencies and livelihood support.
- Response. Provide safe drinking water and urgent livelihood, fodder or health support according to assessed need; manage scarce resources fairly.
- Recovery. Restore productive capacity and livelihoods, repair water systems and improve future planning. Review whether reconstruction and new demand would recreate the same water stress.
How the cycle connects in one village
Before a deficient monsoon, the village improves storage and water-use efficiency: this is mitigation. When monitoring shows a deficit, authorities activate a prepared priority-supply plan: this is preparedness. During severe shortage, safe drinking-water supply and targeted livelihood assistance are response. After conditions improve, repairing sources and restoring livelihoods are recovery. Reviewing which households were excluded should change the next plan. Thus recovery feeds into better mitigation and preparedness rather than simply restoring the earlier vulnerability.
In the six-stage lecture diagram, prevention and mitigation are shown separately, and rehabilitation/reconstruction are distinguished within recovery. The stages can overlap; an activity is classified by its purpose, not just its calendar date.
Q3(b). Explain eight ethical principles applicable during response. [10 practice marks]
Answer
Ethics is needed because scarce resources, urgent decisions and disrupted normal safeguards can lead to exclusion, exploitation and unsafe actions. It provides standards for fair prioritisation, accountability, dignity and public trust.
- Humanitarian assistance. Protect life and provide essentials according to need. For example, distribute safe drinking water to communities whose supply has failed.
- Information and participation. Give accurate, accessible updates and involve affected people. Explain shelter locations in local languages and listen to residents about missing people.
- Responsible evacuation. Use safe routes, transport and accessible shelters; explain the danger and preserve dignity. Any compulsory evacuation must follow lawful authority and necessity.
- Respect for dignity. Protect privacy, sanitation and freedom from exploitation. Separate private changing and washing facilities reduce risks in crowded shelters.
- Respect for persons. Treat survivors respectfully and protect their identity, culture and consent where possible. Do not publish identifiable distressing images merely for publicity.
- Assistance for those needing additional support. Arrange assistance for children, older people, pregnant people and persons with disabilities according to actual needs. Do not separate dependants from carers unnecessarily.
- Protection of rescue workers. Provide training, protective equipment, communication, safe deployment and rest. A fatigued, unprotected responder can become another casualty.
- Environmental and social restoration. Control hazardous waste, protect water sources and restore family/community links. Safe debris disposal and family reunification prevent secondary harm.
Q4(a). Explain four landslide causes and four mitigation measures. [10 practice marks]
Answer
Four causes
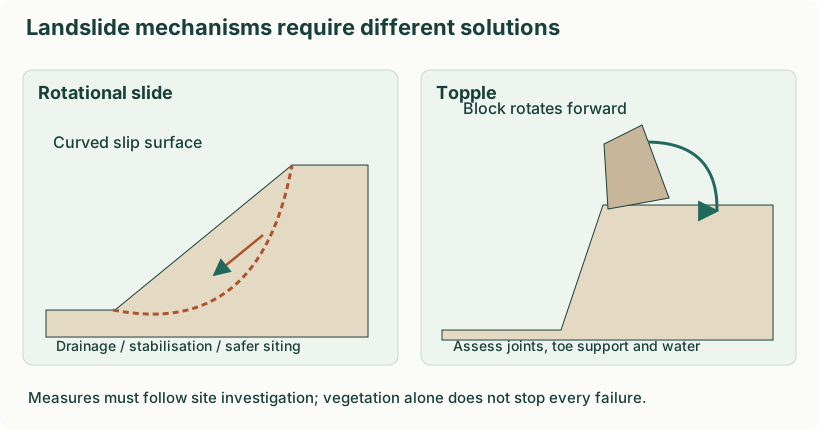
- Rainfall and saturation. Water increases pore pressure and reduces effective resistance along a potential slip surface. Prolonged or intense rain can therefore destabilise an already weak slope.
- Earthquake shaking. Shaking adds dynamic forces and can dislodge fractured rock or weaken soil. Unstable slopes may fail during or after a strong earthquake.
- Loss of support or vegetation. River erosion, road cutting and excavation remove support at the toe; loss of roots can reduce shallow soil reinforcement.
- Weak or unfavourable geology. Steep slopes, weathered material and joints or bedding dipping toward the valley can make movement easier. Construction loads may further disturb the balance.
Four mitigation measures
- Control water. Maintain surface drains and, where designed, subsurface drainage. Diverting water safely reduces saturation; do not discharge it onto another unstable slope.
- Stabilise the slope. Qualified engineers can use retaining structures, anchors, soil nails or regrading after investigation. The design must suit the failure mechanism and include drainage.
- Protect cover and regulate land use. Restore suitable vegetation, limit quarrying and avoid unsafe toe cutting or building on unstable ground. Vegetation helps some shallow failures but cannot stop every deep landslide.
- Map, monitor and prepare. Use susceptibility maps, rainfall observations and movement indicators to prioritise closures and evacuation. Mark safe routes and train residents to report new cracks or tilting structures.
Q4(b). Explain how GIS supports tsunami management in four phases. [10 practice marks]
Answer
For tsunami management, GIS provides a common location-based picture for agencies. Data quality, access, update time and field verification determine its usefulness.
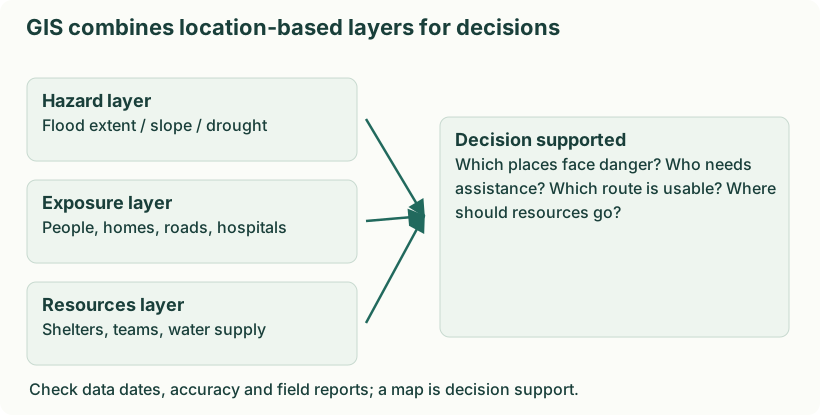
- Mitigation. Combine coastal elevation, modelled inundation and exposed settlements to guide land use and locate critical facilities outside high-risk areas.
- Preparedness. Map safe high ground, marked routes, travel time, shelters and people needing assistance. Use realistic scenarios in evacuation drills.
- Response. Overlay verified inundation, blocked roads, stranded people and available rescue resources. Use updated information to select safer access and prioritise urgent assistance.
- Recovery. Compare before/after imagery, map damage and service restoration, plan safer reconstruction and monitor whether assistance reaches affected settlements.
Remote sensing can update affected-area mapping, but weather, resolution, signal availability and processing time may limit observations. Protect sensitive household and health information when sharing maps.
Q5(a). Develop a ten-point fire-drill planning checklist. [10 practice marks]
Answer
A fire drill is a planned rehearsal of emergency procedures. The checklist should test safe action and reveal practical weaknesses without creating a real hazard.
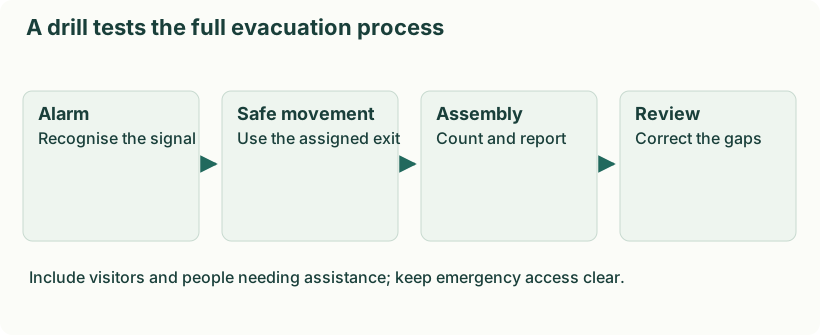
- Assess the building. Identify ignition sources, fuel, occupancy and high-risk rooms; choose a realistic scenario.
- Set objectives. Decide whether the drill tests alarm recognition, evacuation, assisted movement or accountability.
- Inspect exits. Check that exit routes are marked, usable and free of obstructions; do not create unsafe bottlenecks.
- Choose an assembly point. Select a safe, accessible place away from smoke, structures and emergency vehicle access.
- Test communication. Check alarms and public-address systems; prepare a backup and an unambiguous signal for a real emergency.
- Assign responsibilities. Name an incident coordinator, floor wardens, first-aid staff and people responsible for counting occupants.
- Include everyone. Plan assistance for persons with disabilities, visitors and others needing support; brief helpers in advance.
- Coordinate services. Inform relevant building managers and emergency services; keep equipment ready for trained users.
- Observe and account. Record movement and delays, conduct a headcount, report missing people and keep participants from re-entering.
- Debrief and correct. Review observations, assign corrective actions, update the plan and repeat the drill after improvements.
Q5(b). Explain METHANE with a complete example incident report. [10 practice marks]
Answer
Definition. Structured incident reporting gives responders a common picture of an emergency. METHANE is a widely used multi-agency reporting mnemonic that appears in the supplied archive’s TEE questions.
| Letter | Information to report |
|---|---|
| M | Major incident: declared or not; do not invent a declaration. |
| E | Exact location: identifiable site and geographic details. |
| T | Type of incident. |
| H | Hazards present or developing. |
| A | Access: safe entry and exit routes, including blockages. |
| N | Number and condition of casualties; label estimates and unknowns. |
| E | Emergency services present and required. |
The acronym is not a chemistry question about methane gas. Send a short verified initial report, distinguish observations from estimates, and update as information changes. Exact procedures follow the relevant response organisation; this mnemonic is included as an archival examination application.
Example report: hypothetical flood incident
Major incident status: awaiting confirmation. Location: east-bank bridge approach, Ward 4. Type: river inundation. Hazards: fast water and damaged power line. Access: west approach closed; north road currently confirmed usable. Casualties: three people reported stranded; injury status unknown. Services: local police on scene; authorised rescue and utility support requested. This is an illustration, not a report of a real event.
Emergency management expert: role by phase
- Assess hazards and vulnerability and translate findings into plans.
- Define responsibilities and coordinate agencies, communities and resources.
- Train personnel, organise safe drills and improve weak procedures.
- During response, support verified information, priorities and resource allocation.
- During recovery, assess needs, restore systems, plan resilient reconstruction and review lessons.
Worked incident report: illustrative details
| Field | Example report |
|---|---|
| M | Major incident declared by the authorised incident commander. |
| E | Example: Riverside School, east gate, mapped grid reference shared with control. |
| T | Flooding with people stranded. |
| H | Fast water, submerged electrical equipment and unstable walls. |
| A | Use the northern approach; southern bridge reported closed. Confirm route status. |
| N | Twenty people reported stranded; injuries not yet confirmed. |
| E | Police and fire teams on scene; request water rescue and medical support. |
Update time-stamped information as it is verified. METHANE is an acronym for structured reporting here, not the chemical methane gas.
Q6(a). Explain five measures for reducing cyclone losses in a coastal city. [10 practice marks]
Answer
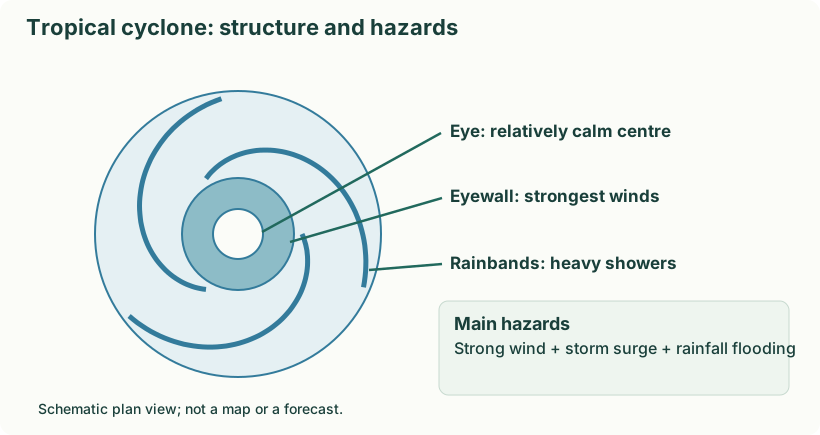
- Warning and last-mile communication. Use official forecasts, clear action messages and several communication channels. A forecast must reach fishers, visitors and people without smartphones, with enough time and support to act.
- Shelters and evacuation access. Provide accessible shelters outside surge and flood zones, linked by reliable routes. Practise transport, headcounts and support for people needing assistance so that shelter capacity becomes usable protection.
- Resilient buildings and lifelines. Strengthen roof connections and protect power, water and communication systems to appropriate standards. Hospitals require backup services and protected equipment to keep functioning during response.
- Risk-informed coastal land use. Use surge and flood maps to control exposed development and locate critical infrastructure safely. Protect mangroves and appropriate coastal vegetation as part of a wider protection system, not a guaranteed barrier against every surge.
- Drainage and protective works. Maintain drains and outfalls and use engineered embankments, sea walls or detention where justified by local studies. Consider overtopping, erosion and downstream effects; combine works with warning and evacuation.
Q6(b). Describe the Gujarat earthquake and six recovery-linked mitigation measures. [10 practice marks]
Answer
- Event and setting: On 26 January 2001 a major earthquake struck the Kutch region of Gujarat.
- Causes and vulnerability: Fault rupture caused strong shaking; vulnerable buildings and lifelines amplified losses.
- Impacts: Building collapse, deaths and injuries, disrupted services and large housing and livelihood needs.
- Response and recovery: Search and rescue, medical help and temporary shelter; longer-term reconstruction and institutional strengthening.
- Lessons: Use seismic design and retrofitting, improve construction quality, protect lifelines, train communities, support owner/community participation and rebuild with risk reduction.
Following the 26 January 2001 earthquake, Gujarat’s recovery programme linked reconstruction with longer-term risk reduction. Six relevant measures are:
- Institutional strengthening. GSDMA was established in February 2001 to coordinate reconstruction and develop preparedness and mitigation capacity.
- Safer housing repair and reconstruction. The programme repaired and rebuilt damaged homes; risk reduction requires appropriate earthquake-resistant design and construction quality rather than simple replacement.
- Restoration of critical public facilities. Schools, hospitals, water systems and other public assets were repaired or reconstructed to restore essential functions and improve safety.
- Town planning and access. Reconstruction in affected towns included improved roads, planned open spaces and services, supporting evacuation and future emergency access.
- Training construction workers. Training and certification of masons and capacity building for engineers promoted earthquake-resistant construction practices.
- Community preparedness and long-term systems. Multi-hazard preparedness, community participation and strengthened emergency-management institutions connected recovery to future resilience.
Q7(a). Recommend six preparedness measures for an industrial gas leak. [10 practice marks]
Answer
- Detect and identify hazards. Inventory chemicals, assess credible leak scenarios and install suitable detectors and alarms. Knowing what can leak determines the required warning and response.
- Maintain and audit equipment. Inspect pipelines, valves, vessels and interlocks; investigate defects and follow safe operating procedures. Prevention reduces the chance of a leak rather than only treating its consequences.
- Prepare on-site and off-site plans. Map potential affected areas and coordinate with authorities, hospitals and neighbouring communities. Specify incident command, isolation procedures, communication and resource requests.
- Plan protective action. Pre-identify safe assembly locations, alternate routes and shelter arrangements based on the chemical and official advice. A gas release may require evacuation or shelter-in-place; one direction or action is not safe for every chemical.
- Train and rehearse. Teach workers to recognise alarms, report incidents and follow their assigned roles. Practise communication, accountability and coordination without releasing hazardous material.
- Equip and communicate. Provide suitable PPE and specialised response resources for trained teams; maintain backup communication. Inform communities clearly and arrange medical support while preventing untrained rescue entry.
Q7(b). Explain heat-wave and cold-wave precautions. [10 practice marks]
Answer
| Aspect | Heat-wave response | Cold-wave response |
|---|---|---|
| Exposure | Use shade/cooling and reduce strenuous activity during extreme heat; do not remain in a hot parked vehicle. | Move to a warm, dry shelter; do not remain in wet clothes. |
| Clothing | Wear suitable lightweight clothing and sun protection. | Use dry layers and protect the head, hands and feet. |
| Hydration and food | Drink safe fluids and follow relevant medical advice; do not rely on alcohol. | Maintain food and fluids; do not assume alcohol safely warms the body. |
| Protect others | Check on vulnerable people and never leave a child in a closed hot vehicle. | Check on isolated people and arrange blankets and night shelter. |
| Warning signs and safe care | Serious confusion, collapse or severe heat illness needs urgent medical help. | Marked confusion, drowsiness or suspected hypothermia needs urgent medical help; avoid unsafe direct intense heating. |
| Indoor equipment | Use cooling safely and plan for power loss. | Use safe ventilated heating; never use charcoal or a generator inside an enclosed room. |